Docker的网络实现了容器和容器外部、不同容器之间通信。
network namespace
linux的network namespace是用来隔离网络设备, IP地址, 端口等,network namespace为命名空间中的所有进程提供了全新的网络堆栈。
创建和删除 network namespace
使用ip netns add NAME可以创建一个network namespace,如下是创建了两个network namespace,分别是test1、test2:
[heql@ubuntu ~]$ sudo ip netns add test1
[heql@ubuntu ~]$ sudo ip netns add test2
使用ip netns delete NAME即可删除一个network namespace。
查看 network namespace
使用ip netns list可以查看network namespace:
[heql@ubuntu ~]$ sudo ip netns list
test2
test1
查看 network namespace的IP
[heql@ubuntu ~]$ sudo ip netns exec test1 ip a
1: lo: <LOOPBACK> mtu 65536 qdisc noop state DOWN group default
    link/loopback 00:00:00:00:00:00 brd 00:00:00:00:00:00
从上面的可以看到lo的端口的状态是DOWN,如果想要lo的端口处于UP状态,可以使用如下命令:
[heql@ubuntu ~]$ sudo ip netns exec test1 ip link set dev lo up
[heql@ubuntu ~]$ sudo ip netns exec test1 ip link
1: lo: <LOOPBACK,UP,LOWER_UP> mtu 65536 qdisc noqueue state UNKNOWN mode DEFAULT group default
    link/loopback 00:00:00:00:00:00 brd 00:00:00:00:00:00
Veth
如果想要两个network namespace之间进行通信,需要使用Veth。
创建veth
[heql@ubuntu ~]$ sudo ip link add veth-test1 type veth peer name veth-test2
添加成功后,执行ip link可以看到如下信息:
[heql@ubuntu ~]$ ip link
30: veth-test2@veth-test1: <BROADCAST,MULTICAST,M-DOWN> mtu 1500 qdisc noop state DOWN mode DEFAULT group default qlen 1000
    link/ether 3a:ef:ae:66:3d:42 brd ff:ff:ff:ff:ff:ff
31: veth-test1@veth-test2: <BROADCAST,MULTICAST,M-DOWN> mtu 1500 qdisc noop state DOWN mode DEFAULT group default qlen 1000
    link/ether ca:5d:6b:25:ce:02 brd ff:ff:ff:ff:ff:ff
添加veth至network namespace
执行如下命令,可以把veth-test1添加到test1的network namespace:
[heql@ubuntu ~]$ sudo ip link set veth-test1 netns test1
[heql@ubuntu ~]$ sudo ip netns exec test1 ip link
1: lo: <LOOPBACK,UP,LOWER_UP> mtu 65536 qdisc noqueue state UNKNOWN mode DEFAULT group default
    link/loopback 00:00:00:00:00:00 brd 00:00:00:00:00:00
31: veth-test1@if30: <BROADCAST,MULTICAST> mtu 1500 qdisc noop state DOWN mode DEFAULT group default qlen 1000
    link/ether ca:5d:6b:25:ce:02 brd ff:ff:ff:ff:ff:ff
同理可以把veth-test2添加到test2的network namespace:
[heql@ubuntu ~]$ sudo ip netns exec test2 ip link
1: lo: <LOOPBACK> mtu 65536 qdisc noop state DOWN mode DEFAULT group default
    link/loopback 00:00:00:00:00:00 brd 00:00:00:00:00:00
30: veth-test2@if31: <BROADCAST,MULTICAST> mtu 1500 qdisc noop state DOWN mode DEFAULT group default qlen 1000
    link/ether 3a:ef:ae:66:3d:42 brd ff:ff:ff:ff:ff:ff
分配IP地址
首先要启动veth端口:
[heql@ubuntu ~]$ sudo ip netns exec test1 ip link set dev veth-test1 up
[heql@ubuntu ~]$ sudo ip netns exec test2 ip link set dev veth-test2 up
分配IP地址:
[heql@ubuntu ~]$ sudo ip netns exec test1 ip addr add 192.168.1.1/24 dev veth-test1
[heql@ubuntu ~]$ sudo ip netns exec test2 ip addr add 192.168.1.2/24 dev veth-test2
[heql@ubuntu ~]$
[heql@ubuntu ~]$ sudo ip netns exec test1 ip a
1: lo: <LOOPBACK,UP,LOWER_UP> mtu 65536 qdisc noqueue state UNKNOWN group default
    link/loopback 00:00:00:00:00:00 brd 00:00:00:00:00:00
    inet 127.0.0.1/8 scope host lo
    valid_lft forever preferred_lft forever
    inet6 ::1/128 scope host
    valid_lft forever preferred_lft forever
31: veth-test1@if30: <BROADCAST,MULTICAST,UP,LOWER_UP> mtu 1500 qdisc pfifo_fast state UP group default qlen 1000
    link/ether ca:5d:6b:25:ce:02 brd ff:ff:ff:ff:ff:ff
    inet 192.168.1.1/24 scope global veth-test1
    valid_lft forever preferred_lft forever
    inet6 fe80::c85d:6bff:fe25:ce02/64 scope link
    valid_lft forever preferred_lft forever
[heql@ubuntu ~]$ sudo ip netns exec test2 ip a
1: lo: <LOOPBACK> mtu 65536 qdisc noop state DOWN group default
    link/loopback 00:00:00:00:00:00 brd 00:00:00:00:00:00
30: veth-test2@if31: <BROADCAST,MULTICAST,UP,LOWER_UP> mtu 1500 qdisc pfifo_fast state UP group default qlen 1000
    link/ether 3a:ef:ae:66:3d:42 brd ff:ff:ff:ff:ff:ff
    inet 192.168.1.2/24 scope global veth-test2
    valid_lft forever preferred_lft forever
    inet6 fe80::38ef:aeff:fe66:3d42/64 scope link
    valid_lft forever preferred_lft forever
通信
上面的配置成功后,network namespace test1和test2就可以正确通信了:
[heql@ubuntu ~]$ sudo ip netns exec test1 ping 192.168.1.2
PING 192.168.1.2 (192.168.1.2) 56(84) bytes of data.
64 bytes from 192.168.1.2: icmp_seq=1 ttl=64 time=0.637 ms
64 bytes from 192.168.1.2: icmp_seq=2 ttl=64 time=0.117 ms
64 bytes from 192.168.1.2: icmp_seq=3 ttl=64 time=0.116 ms

[heql@ubuntu ~]$ sudo ip netns exec test2 ping 192.168.1.1
PING 192.168.1.1 (192.168.1.1) 56(84) bytes of data.
64 bytes from 192.168.1.1: icmp_seq=1 ttl=64 time=0.183 ms
64 bytes from 192.168.1.1: icmp_seq=2 ttl=64 time=0.106 ms
64 bytes from 192.168.1.1: icmp_seq=3 ttl=64 time=0.104 ms
^C
--- 192.168.1.1 ping statistics ---
3 packets transmitted, 3 received, 0% packet loss, time 1998ms
rtt min/avg/max/mdev = 0.104/0.131/0.183/0.036
Docker的Bridge网络
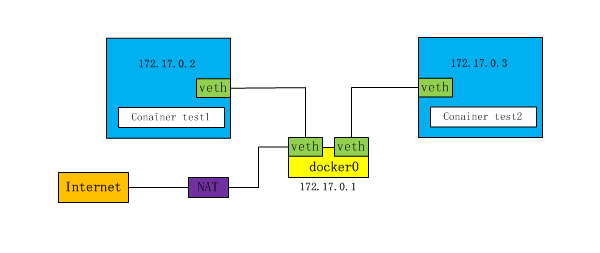
在bridge模式下:
- 连在同一网桥上的容器可以相互通信,通过上面的veth实现。
- 容器也可以与外部通信,数据包从容器出来,由于容器是桥接到docker0上,所以数据包会发到docker0上,然后在通过NAT转换,实现对外通信。
如下,创建一个的容器:
[heql@ubuntu ~]$ docker run -d --name test1 busybox /bin/sh -c "while true; do sleep 3600; done"
[heql@ubuntu ~]$ docker ps
CONTAINER ID        IMAGE               COMMAND                  CREATED             STATUS              PORTS               NAMES
beb73a179c71        busybox             "/bin/sh -c 'while t…"   35 seconds ago      Up 32 seconds                           test1
通过下面的命令,可以看到test1的网络连接到bridge网络中:
[heql@ubuntu ~]$ docker network ls
NETWORK ID          NAME                DRIVER              SCOPE
be05ef2f2f1d        bridge              bridge              local
0609e6a3110a        host                host                local
effb6daa2ce0        none                null                local

[heql@ubuntu ~]$ docker network inspect be05ef2f2f1d
"Containers": {
        "beb73a179c71d64b7bb626f180374453062d1551dc4a2a989edbc81b6385ec64": {
            "Name": "test1",
            "EndpointID": "798b6bde6a1921729aab389efaa23dfdfc7ff14e8c851fc9c217ce43ea059b7d",
            "MacAddress": "02:42:ac:11:00:02",
            "IPv4Address": "172.17.0.2/16",
            "IPv6Address": ""
        }
    }
使用ip a命令可以看到,如下两个接口,docker0、veth54c9f49:
[heql@ubuntu ~]$ ip a
3: docker0: <BROADCAST,MULTICAST,UP,LOWER_UP> mtu 1500 qdisc noqueue state UP group default
    link/ether 02:42:36:76:5f:42 brd ff:ff:ff:ff:ff:ff
    inet 172.17.0.1/16 brd 172.17.255.255 scope global docker0
    valid_lft forever preferred_lft forever
    inet6 fe80::42:36ff:fe76:5f42/64 scope link
    valid_lft forever preferred_lft forever
33: veth54c9f49@if32: <BROADCAST,MULTICAST,UP,LOWER_UP> mtu 1500 qdisc noqueue master docker0 state UP group default
    link/ether c2:50:52:9d:86:dc brd ff:ff:ff:ff:ff:ff
    inet6 fe80::c050:52ff:fe9d:86dc/64 scope link
    valid_lft forever preferred_lft forever
进入test1容器,执行ip -a命令:
[heql@ubuntu ~]$ docker exec -it test1 /bin/sh
/ # ip a
1: lo: <LOOPBACK,UP,LOWER_UP> mtu 65536 qdisc noqueue
    link/loopback 00:00:00:00:00:00 brd 00:00:00:00:00:00
    inet 127.0.0.1/8 scope host lo
    valid_lft forever preferred_lft forever
32: eth0@if33: <BROADCAST,MULTICAST,UP,LOWER_UP,M-DOWN> mtu 1500 qdisc noqueue
    link/ether 02:42:ac:11:00:02 brd ff:ff:ff:ff:ff:ff
    inet 172.17.0.2/16 brd 172.17.255.255 scope global eth0
    valid_lft forever preferred_lft forever
执行brctl show命令,可以看到,docker0上有一个veth54c9f49接口:
[heql@ubuntu ~]$ brctl show
bridge name    bridge id        STP enabled    interfaces
docker0        8000.024236765f42    no        veth54c9f49
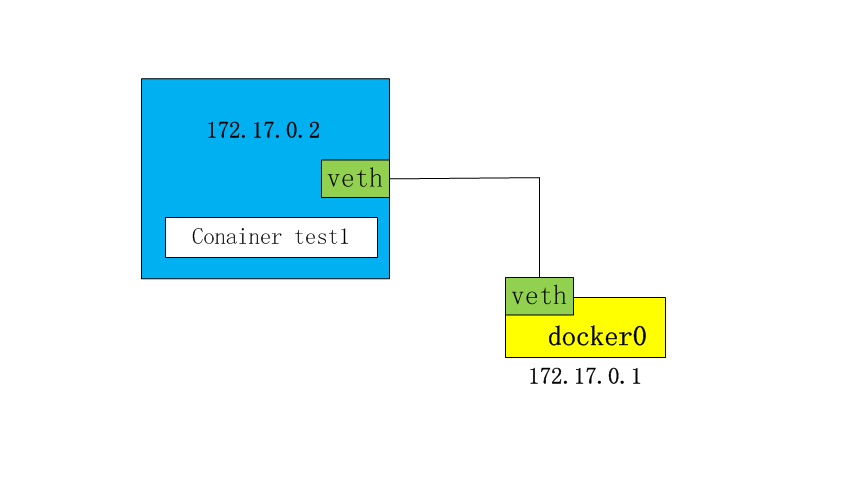
也就说,docker0上的veth54c9f49接口和容器test1里面的eth0@if33接口是一对veth,就像上面的network namespace test1和test2,从而实现了容器test1和docker0通信。形成了如下拓扑图:
再创建一个容器test2:
[heql@ubuntu ~]$ docker run -d --name test2 busybox /bin/sh -c "while true; do sleep 3600; done"
01ec580a6477d550f0245ca41b2e3f7c33896f9aeae5491d594ccfb511897676
[heql@ubuntu ~]$ docker ps
CONTAINER ID        IMAGE               COMMAND                  CREATED             STATUS              PORTS               NAMES
01ec580a6477        busybox             "/bin/sh -c 'while t…"   4 seconds ago       Up 3 seconds                            test2
beb73a179c71        busybox             "/bin/sh -c 'while t…"   39 minutes ago      Up 39 minutes                           test1
可以看到test2的网络连接到bridge网络中:
[heql@ubuntu ~]$ docker network inspect be05ef2f2f1d
"Containers": {
            "01ec580a6477d550f0245ca41b2e3f7c33896f9aeae5491d594ccfb511897676": {
                "Name": "test2",
                "EndpointID": "c63309bec5f99de16b8542320f7e7fda5a85b5fd5e31aed6a23beba2d7831153",
                "MacAddress": "02:42:ac:11:00:03",
                "IPv4Address": "172.17.0.3/16",
                "IPv6Address": ""
            },
            "beb73a179c71d64b7bb626f180374453062d1551dc4a2a989edbc81b6385ec64": {
                "Name": "test1",
                "EndpointID": "798b6bde6a1921729aab389efaa23dfdfc7ff14e8c851fc9c217ce43ea059b7d",
                "MacAddress": "02:42:ac:11:00:02",
                "IPv4Address": "172.17.0.2/16",
                "IPv6Address": ""
            }
        },
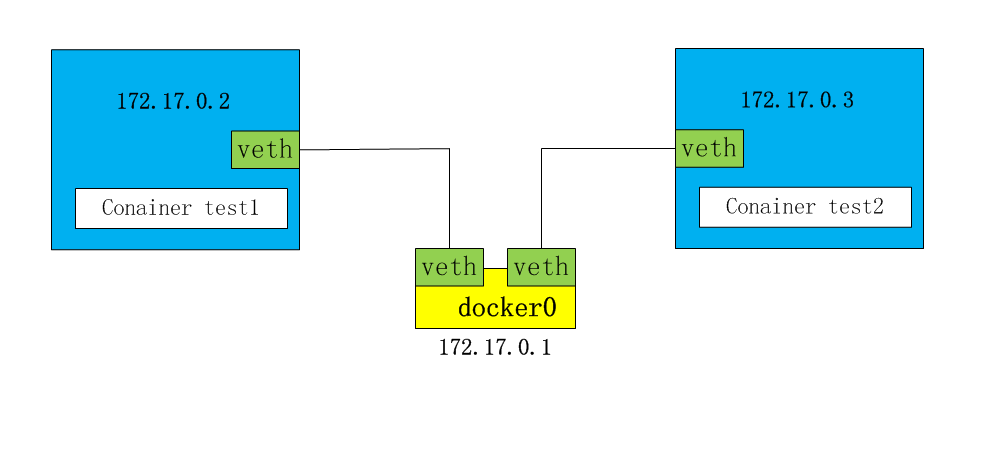
使用brctl show命令,可以看到,docker0上有两个接口,veth54c9f49、veth04fe000:
[heql@ubuntu ~]$ brctl show
bridge name    bridge id        STP enabled    interfaces
docker0        8000.024236765f42    no        veth04fe000
                            veth54c9f49
形成了如下拓扑图:
容器test1和test2,可以相互ping通:
[heql@ubuntu ~]$ docker exec -it test1 /bin/sh
/ # ping 172.17.0.3
PING 172.17.0.3 (172.17.0.3): 56 data bytes
64 bytes from 172.17.0.3: seq=0 ttl=64 time=1.878 ms
64 bytes from 172.17.0.3: seq=1 ttl=64 time=0.125 ms
64 bytes from 172.17.0.3: seq=2 ttl=64 time=0.194 ms

[heql@ubuntu ~]$ docker exec -it test2 /bin/sh
/ # ping 172.17.0.2
PING 172.17.0.2 (172.17.0.2): 56 data bytes
64 bytes from 172.17.0.2: seq=0 ttl=64 time=0.477 ms
64 bytes from 172.17.0.2: seq=1 ttl=64 time=0.193 ms
64 bytes from 172.17.0.2: seq=2 ttl=64 time=0.118 ms
在容器test1、test2中,对外网也是可以访问的,这是通过NAT转换实现的。
[heql@ubuntu ~]$ docker exec -it test1 /bin/sh
/ # ping cn.bing.com
PING cn.bing.com (202.89.233.101): 56 data bytes
64 bytes from 202.89.233.101: seq=0 ttl=127 time=74.048 ms
64 bytes from 202.89.233.101: seq=1 ttl=127 time=73.928 ms
64 bytes from 202.89.233.101: seq=3 ttl=127 time=74.903 ms
容器间的LINK
容器间的LINK,提供了一种在不同的容器间可以通过容器的名字来通信的机制。例如有一个后台的程序,想要访问MySQL的容器的服务,就需要知道MySQL容器的IP地址和端口,但是容器的IP地址是不固定的,这时就可以使用容器间的LINK,使得后台的程序可以直接通过MySQL容器的名字和端口号,直接访问数据库。
启动test1容器:
[heql@ubuntu ~]$ docker run -d --name=test1 busybox /bin/sh -c "while true; do sleep 3600; done"
启动test2容器,启动的时候指定link到test1容器中:
[heql@ubuntu ~]$ docker run -d --name=test2 --link test1 busybox /bin/sh -c "while true; do sleep 3600; done"
进入到test2容器中,直接使用容器test1的名字,就可以通信:
[heql@ubuntu ~]$ docker exec -it test2 /bin/sh
/ # ping test1
PING test1 (172.17.0.2): 56 data bytes
64 bytes from 172.17.0.2: seq=0 ttl=64 time=0.563 ms
64 bytes from 172.17.0.2: seq=1 ttl=64 time=0.189 ms
但是在容器test1中,不能直接使用容器test2的名字,进行通信,因为容器的link是有方向的:
[heql@ubuntu ~]$ docker exec -it test1 /bin/sh
/ # ping test2
ping: bad address 'test2'
自定义网络
如下,创建了一个my-bridge的网络,driver使用的是bridge模式:
[heql@ubuntu ~]$ docker network create -d bridge my-bridge
ba700ffa1e8f645b2c96af09aa58eeddba973afe7356271828ebd56a6ce7b16a
[heql@ubuntu ~]$ docker network ls
NETWORK ID          NAME                DRIVER              SCOPE
d22bcab1e0eb        bridge              bridge              local
ff50d198b5dc        docker_gwbridge     bridge              local
65e22acf0beb        host                host                local
ba700ffa1e8f        my-bridge           bridge              local
c305a4b53c3b        none                null                local
在创建容器时,可以指定连接到的网络:
[heql@ubuntu ~]$ docker run -d --name=test1 --network my-bridge busybox sh -c "while true; do sleep 3600; done"
f03bde21fd93473a9c918f83ca9df843836c73631d7c9b3b5c0ec9edf04da138
[heql@ubuntu ~]$ docker run -d --name=test2 --network my-bridge busybox sh -c "while true; do sleep 3600; done"
7efcdd3343e0531aa0a108c7adb2cc18c8db4074bf4ce02c541ea24f91bf5144
可以看到容器test1、test2,已经连接到了my-bridge:
[heql@ubuntu ~]$ docker network inspect my-bridge
 "Containers": {
        "7efcdd3343e0531aa0a108c7adb2cc18c8db4074bf4ce02c541ea24f91bf5144": {
            "Name": "test2",
            "EndpointID": "e1e96d8ab020b65e92c9f1c7ed3177dbae0ab0e8af734860c84dff66a6d913f9",
            "MacAddress": "02:42:ac:13:00:03",
            "IPv4Address": "172.19.0.3/16",
            "IPv6Address": ""
        },
        "f03bde21fd93473a9c918f83ca9df843836c73631d7c9b3b5c0ec9edf04da138": {
            "Name": "test1",
            "EndpointID": "2badf2d43d973408bf9c8a6deb7cefc050ac527be4673f8b7a4f38319a3398a8",
            "MacAddress": "02:42:ac:13:00:02",
            "IPv4Address": "172.19.0.2/16",
            "IPv6Address": ""
        }
    },
执行命令,可以看到容器test1可以使用test2的IP进行通信:
[heql@ubuntu ~]$ docker exec test1 ping 172.19.0.3
PING 172.19.0.3 (172.19.0.3): 56 data bytes
64 bytes from 172.19.0.3: seq=0 ttl=64 time=0.165 ms
64 bytes from 172.19.0.3: seq=1 ttl=64 time=0.205 ms
64 bytes from 172.19.0.3: seq=2 ttl=64 time=0.202 ms
直接使用test2的名字,也可以进行通信:
[heql@ubuntu ~]$ docker exec test1 ping test2
PING test2 (172.19.0.3): 56 data bytes
64 bytes from 172.19.0.3: seq=0 ttl=64 time=0.167 ms
64 bytes from 172.19.0.3: seq=1 ttl=64 time=0.214 ms
64 bytes from 172.19.0.3: seq=2 ttl=64 time=0.206 ms
反过来,在test2中使用容器test1的名字也是可以通信的:
[heql@ubuntu ~]$ docker exec test2 ping test1
PING test1 (172.19.0.2): 56 data bytes
64 bytes from 172.19.0.2: seq=0 ttl=64 time=0.297 ms
64 bytes from 172.19.0.2: seq=1 ttl=64 time=0.250 ms
64 bytes from 172.19.0.2: seq=2 ttl=64 time=0.277 ms
端口映射
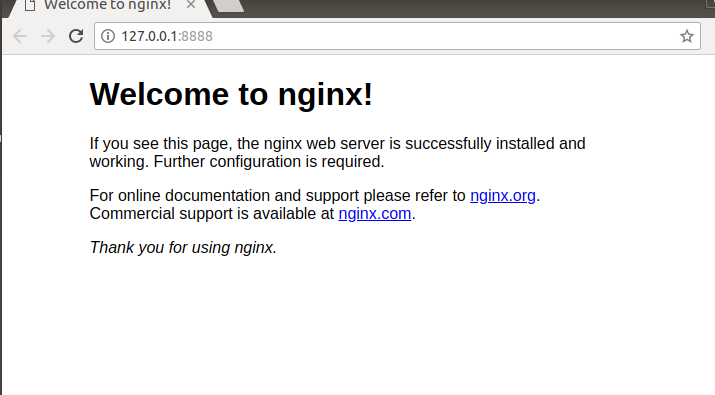
在容器运行时,可以把容器内提供相应服务的端口,映射到本地的端口,如下,在运行nginx时,把nginx的容器的80端口映射到本地的8888端口:
[heql@ubuntu ~]$ docker run -d -p 8888:80 nginx
a4830d511808145f312ee1548459046f89ecd348229f3d0ab18c9e473961cc00
[heql@ubuntu ~]$ docker ps
CONTAINER ID        IMAGE               COMMAND                  CREATED             STATUS              PORTS                  NAMES
a4830d511808        nginx               "nginx -g 'daemon of…"   8 seconds ago       Up 7 seconds        0.0.0.0:8888->80/tcp   goofy_poitras
在本地的浏览器中,访问127.0.0.1:8888,可以看到如下的界面:
Docker的none网络和host网络
none网络
none网络就是什么都没有的网络。挂在这个网络下的容器除了lo,没有其他任何网卡。容器run时,可以通过添加–network=none参数来指定该容器使用none网络。
none网络应用与隔离场景,一些对安全性要求高并且不需要联网的应用可以使用none网络。
如下,将容器test1连接到none网络,进入容器test1,可以看到只有lo接口:
[heql@ubuntu ~]$ docker run -d --name=test1 --network=none busybox /bin/sh -c "while true; do sleep 3600; done"
73ce8d01f47a5885ab303fb4c20ed0d4137d4466ec777a3a16e7d395aa6e3f11
[heql@ubuntu ~]$ docker exec -it test1 /bin/sh/ # ip a
1: lo: <LOOPBACK,UP,LOWER_UP> mtu 65536 qdisc noqueue
    link/loopback 00:00:00:00:00:00 brd 00:00:00:00:00:00
    inet 127.0.0.1/8 scope host lo
    valid_lft forever preferred_lft forever
/ #
host网络
连接到host网络的容器共享Docker宿主机的网络栈,即容器的网络配置与host宿主机完全一样。
直接使用Docker host的网络最大的好处就是性能,如果容器对网络传输效率有较高要求,则可以选择host网络。当然不便之处就是牺牲一些灵活性,比如要考虑端口冲突问题,Docker host上已经使用的端口就不能再用了。
如下,将容器test1连接到host网络,进入容器test1,可以看到容器test1的配置和主机时一样的:
[heql@ubuntu ~]$ docker run -d --name=test1 --network=host busybox /bin/sh -c "while true; do sleep 3600; done"
012810607ce59244b9a535f23297d34163e972328af6c263f731011c608d10e2
[heql@ubuntu ~]$ docker exec -it test1 /bin/sh/ # ip a
1: lo: <LOOPBACK,UP,LOWER_UP> mtu 65536 qdisc noqueue
    link/loopback 00:00:00:00:00:00 brd 00:00:00:00:00:00
    inet 127.0.0.1/8 scope host lo
    valid_lft forever preferred_lft forever
    inet6 ::1/128 scope host
    valid_lft forever preferred_lft forever
2: eth0: <BROADCAST,MULTICAST,UP,LOWER_UP> mtu 1500 qdisc pfifo_fast qlen 1000
    link/ether 00:0c:29:78:54:21 brd ff:ff:ff:ff:ff:ff
    inet 192.168.1.135/24 brd 192.168.1.255 scope global eth0
    valid_lft forever preferred_lft forever
    inet6 fe80::20c:29ff:fe78:5421/64 scope link
    valid_lft forever preferred_lft forever
3: docker0: <NO-CARRIER,BROADCAST,MULTICAST,UP> mtu 1500 qdisc noqueue
    link/ether 02:42:79:2a:5c:06 brd ff:ff:ff:ff:ff:ff
    inet 172.17.0.1/16 brd 172.17.255.255 scope global docker0
    valid_lft forever preferred_lft forever
    inet6 fe80::42:79ff:fe2a:5c06/64 scope link
    valid_lft forever preferred_lft forever
14: br-50056a4d3184: <NO-CARRIER,BROADCAST,MULTICAST,UP> mtu 1500 qdisc noqueue
    link/ether 02:42:7e:74:26:3f brd ff:ff:ff:ff:ff:ff
    inet 172.18.0.1/16 brd 172.18.255.255 scope global br-50056a4d3184
    valid_lft forever preferred_lft forever
    inet6 fe80::42:7eff:fe74:263f/64 scope link
    valid_lft forever preferred_lft forever
多容器的部署
有如下python程序,使用redis来记录每次访问web页面的次数,在部署时,可以把redis和应用程序部署在不同容器中:
1 | #!/usr/bin/env python3 |
运行redis容器:
[heql@ubuntu flask-demo]$ docker run -d --name=redis redis
37a3118b732b71d55a5ebc3caec5f28fd5332b53c61fef4383c8c811a70793b4
如下是app.py程序的Dockerfile:
FROM python
LABEL maintainer="heqingliang_gzus@163.com"
RUN pip install flask redis
COPY app.py /app/
WORKDIR /app
EXPOSE 5000
CMD ["python", "app.py"]
使用Dcokerfile构建image:
[heql@ubuntu flask-demo]$ docker build -t heqingliang/flask-app .
运行容器时,使其link到redis容器,并通过环境变量REDIS_HOST设置redis容器的名字:
[heql@ubuntu flask-demo]$ docker run -p 5000:5000 --link redis --name flask-redis -e REDIS_HOST=redis heqingliang/flask-app
访问127.0.0.1:5000,可以看到如下结果:
[heql@ubuntu flask-demo]$ curl 127.0.0.1:5000
<h1>Hello Container, I have been seen b'1' times.</h1>
[heql@ubuntu flask-demo]$ curl 127.0.0.1:5000
<h1>Hello Container, I have been seen b'2' times.</h1>
[heql@ubuntu flask-demo]$ curl 127.0.0.1:5000
<h1>Hello Container, I have been seen b'3' times.</h1>
Docker的overlay网络
overlay网络用于连接不同机器上的docker容器,允许不同机器上的容器相互通信。如上面的程序,如果把redis的容器和应用程序的容器分别部署在不同机器上,则需要使用overlay网络。如下面的拓扑图:

要创建docker的overlay网络:
首先要安装consul或者etcd、zookeeper的集群key-value存储服务。
组成集群的所有主机的主机名不允许重复,因为docker守护进程与consul/etcd/zookeeper通信时,以主机名相互区分
下载etcd
[heql@ubuntu ~]$ wget https://github.com/coreos/etcd/releases/download/v3.3.10/etcd-v3.3.10-linux-amd64.tar.gz
[heql@ubuntu ~]$ tar xzf etcd-v3.3.10-linux-amd64.tar.gz
[heql@ubuntu ~]$ cd etcd-v3.3.10-linux-arm64/
启动etcd
在192.168.33.10机器上启动etcd:
ubuntu@docker-node1:~/etcd-v3.3.10-linux-amd64$ nohup ./etcd --name docker-node1 --initial-advertise-peer-urls http://192.168.33.10:2380 \
--listen-peer-urls http://192.168.33.10:2380 \
--listen-client-urls http://192.168.33.10:2379,http://127.0.0.1:2379 \
--advertise-client-urls http://192.168.33.10:2379 \
--initial-cluster-token etcd-cluster \
--initial-cluster docker-node1=http://192.168.33.10:2380,docker-node2=http://192.168.33.11:2380 \
--initial-cluster-state new&
在192.168.33.11机器上启动etcd:
ubuntu@docker-node2:~/etcd-v3.3.10-linux-amd64$ nohup ./etcd --name docker-node2 --initial-advertise-peer-urls http://192.168.33.11:2380 \
--listen-peer-urls http://192.168.33.11:2380 \
--listen-client-urls http://192.168.33.11:2379,http://127.0.0.1:2379 \
--advertise-client-urls http://192.168.33.11:2379 \
--initial-cluster-token etcd-cluster \
--initial-cluster docker-node1=http://192.168.33.10:2380,docker-node2=http://192.168.33.11:2380 \
--initial-cluster-state new&
listen-peer-urls: 用于节点与节点之间数据交换, 因此需要监听在其他节点可以访问的IP地址上
listen-client-urls: 用户客户机访问etcd数据, 一般监听在本地, 如果需要集中管理, 可以监听在管理服务器可以访问的IP地址上
advertise-client-urls: 在加入proxy节点后, 会使用该广播地址, 因此需要监听在一个proxy节点可以访问的IP地址上
查看etcd集群的状态
ubuntu@docker-node1:~/etcd-v3.3.10-linux-amd64$ ./etcdctl cluster-health
member e05c909863f53313 is healthy: got healthy result from http://192.168.33.10:2379
member f829e5361f1740cc is healthy: got healthy result from http://192.168.33.11:2379
cluster is healthy
重启docker
重启docker,并指定cluster-store为etcd的地址:
在192.168.33.10执行如下命令:
ubuntu@docker-node1:~/etcd-v3.3.10-linux-amd64$ sudo service docker stop
ubuntu@docker-node1:~/etcd-v3.3.10-linux-amd64$ sudo /usr/bin/dockerd -H tcp://0.0.0.0:2375 -H unix:///var/run/docker.sock --cluster-store=etcd://192.168.33.10:2379 --cluster-advertise=192.168.33.10:2375&
在192.168.33.11执行如下命令:
ubuntu@docker-node2:~/etcd-v3.3.10-linux-amd64$ sudo service docker stop
ubuntu@docker-node2:~/etcd-v3.3.10-linux-amd64$ sudo /usr/bin/dockerd -H tcp://0.0.0.0:2375 -H unix:///var/run/docker.sock --cluster-store=etcd://192.168.33.11:2379 --cluster-advertise=192.168.33.11:2375&
cluster-store: docker daemon所使用key value service的地址(本例中即etcd的服务地址)
cluster-advertise 所使用网卡以及docker daemon端口信息
-H: docker demon服务的地址和协议
创建overlay网络
在192.168.33.10创建overlay网络:
[heql@ubuntu ~]$ docker network create -d overlay demo
[heql@ubuntu ~]$ docker network ls
NETWORK ID          NAME                DRIVER              SCOPE
70d52172034e        bridge              bridge              local
88e42f2e0502        demo                overlay             global
ff50d198b5dc        docker_gwbridge     bridge              local
65e22acf0beb        host                host                local
c305a4b53c3b        none                null                local
在192.168.33.11也可以看到192.168.33.10创建的demo网络:
[heql@ubuntu ~]$ docker network ls
NETWORK ID          NAME                DRIVER              SCOPE
eb0df6a88d4d        bridge              bridge              local
88e42f2e0502        demo                overlay             global
eac83f830fb1        docker_gwbridge     bridge              local
4dce7cd5aa57        host                host                local
83856f82e646        none                null                local
容器间通信
在192.168.33.10启动如下容器:
[heql@ubuntu ~]$ docker run -d --name test1 --net demo busybox sh -c "while true; do sleep 3600; done"
在192.168.33.11启动如下容器(注意容器的名字不能和192.168.33.10名字一样):
[heql@ubuntu ~]$ docker run -d --name test2 --net demo busybox sh -c "while true; do sleep 3600; done"
查看demo网络中信息,可以看到容器test1、test2已加入到demo网络中:
[heql@ubuntu ~]$ docker network inspect demo
 "Containers": {
        "6693b4f5d73d5b03d57aab98c19cf27de26b8e386740a438268f24d4e499bf1c": {
            "Name": "test1",
            "EndpointID": "19c78c97923a20e54c814c9e95d3d0956cfa08d21658e9e103a8c61faad5dea7",
            "MacAddress": "02:42:0a:00:00:02",
            "IPv4Address": "10.0.0.2/24",
            "IPv6Address": ""
        },
        "ep-188d188dd00473acba7162fb524304ef6b7e07e4e71829e3d7dc624326c1eed5": {
            "Name": "test2",
            "EndpointID": "188d188dd00473acba7162fb524304ef6b7e07e4e71829e3d7dc624326c1eed5",
            "MacAddress": "02:42:0a:00:00:03",
            "IPv4Address": "10.0.0.3/24",
            "IPv6Address": ""
        }
    },
在192.168.33.10执行如下命令,可以直接使用容器test2名字通信,也可以使用test2的IP:
[heql@ubuntu ~]$ docker exec test1 ping test2
PING test2 (10.0.0.3): 56 data bytes
64 bytes from 10.0.0.3: seq=0 ttl=64 time=0.581 ms
64 bytes from 10.0.0.3: seq=1 ttl=64 time=1.130 ms
64 bytes from 10.0.0.3: seq=2 ttl=64 time=1.371 ms
在192.168.33.11执行如下命令,可以直接使用容器test1名字通信,也可以使用test1的IP:
[heql@ubuntu ~]$ docker exec test2 ping test1
PING test1 (10.0.0.2): 56 data bytes
64 bytes from 10.0.0.2: seq=0 ttl=64 time=0.566 ms
64 bytes from 10.0.0.2: seq=1 ttl=64 time=1.291 ms
64 bytes from 10.0.0.2: seq=2 ttl=64 time=1.100 ms
在overlay网络中部署应用
如在上面多容器部署的例子,把redis和应用程序的容器部署在同一台机器,现在使用overlay网络把redis和应用程序部署在两台机器上,按照上面的方法,创建好overlay网络。
在192.168.33.10机器上启动redis:
[heql@ubuntu ~]$ docker run -d --name=redis --net demo redis
在192.168.33.11机器上启动应用程序:
[heql@ubuntu ~]$ docker run -d -p 5000:5000 --name flask-redis --net demo -e REDIS_HOST=redis heqingliang/flask-app
在192.168.33.11机器,访问127.0.0.1:5000,可以看到如下结果:
[heql@ubuntu ~]$ curl 127.0.0.1:5000
<h1>Hello Container, I have been seen b'1' times.</h1>
[heql@ubuntu ~]$ curl 127.0.0.1:5000
<h1>Hello Container, I have been seen b'2' times.</h1>
[heql@ubuntu ~]$ curl 127.0.0.1:5000
<h1>Hello Container, I have been seen b'3' times.</h1>